
Retargeting can be a relatively inexpensive way to keep your visitors engaged, making purchases and coming back to your website for a multitude of reasons. You worked hard to get them to come to your website in the first place, following up with customers & visitors is a great way to keep the flow going.
Here is another quick tutorial on how to set up retargeting campaigns on Bing Ads.
If you don’t have a Bing Ads account yet I suggest finding one of those sign-up coupons so you can get some free ad spend, it’s not much but upwards of $100 usually. (I will update this when I can get the LDA community a promo code)
Setting Up “UET tag” Tracking
First thing you need to have is a “UET tag” that you can create with Bing Ads in the “Conversion Tracking” tab in the left-hand menu. If you’re familiar with adding a Facebook Pixel this is not too far off, the only real difference is navigating Bings UI.
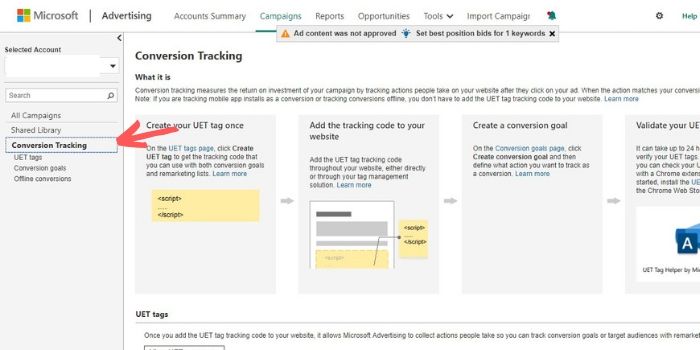
Once you’re in the UET tag section go ahead and click “Create UET tags” and you only really need to have one so naming it should be pretty easy, just remember to keep it descriptive so the next time you look at it you can remember what you did.

Once you’ve done that you are going to get the script you need to add to your website and depending on how you built it you might have to reach out to your developer or whoever manages Google Tag Manager. If it’s built on WordPress it’s pretty easy, you can use a plugin to add scripts in the “<head> </head>” section or you can just add it the “header.php” file within the editor section in appearance. This way it tracks across the entire website.
Verifying UET tag is Active
For Chrome users, a quick way to know if you have installed the tracking properly is to use the “UET Tag Helper” extension. Once you add the UET tag you can test if it’s active using this and immediately know if you are moving on to the next steps.
Set up Conversion Goals
Depending on why you are remarketing to your visitors, whether you’re trying to get more subscribers or more sales you can track the conversion points using goals. It’s important to know the results of your efforts and if you’re currently using Gooogle Analytics to track conversions then you can consider skipping this part.
Navigate to the conversion tracking tab you used to set up the UET tag, from there your going to select “Conversion Goals” and then click “Create conversion goal”.
You should be looking at the following screen:

Each option presents a different way you can track conversions and to keep it simple for now I’ll just use “Destination URL”. So an example would be if you want to track a sale from an e-commerce store and in this situation, you would want to use the final page your customer sees after making a purchase, such as a thank you or confirmation page. This way would only work correctly if the URL is only used after purchase or sign-up, if not you’ll be tracking page visits as a conversion and skew things.
![]()
There are four ways you can set up the URL:
- Equals to – The exact URL that determines a customer has completed the goal, while ignoring http(s) and www.
- Begins with – Matches from the beginning of the URL and onward, while ignoring http(s) and www.
- Contains – Looks to see if the input you place matches anywhere in the URL, “confirmation” will match as long as its anywhere in the URL.
- Regular expression – Would be a custom expression
Once set up you can wait for a conversion to happen or trigger an ad to test it. Remember you can create multiple goals using the one UET tag but it’s always best to not go goal crazy and keep it focused on what most important.
Creating Your Remarketing Audience
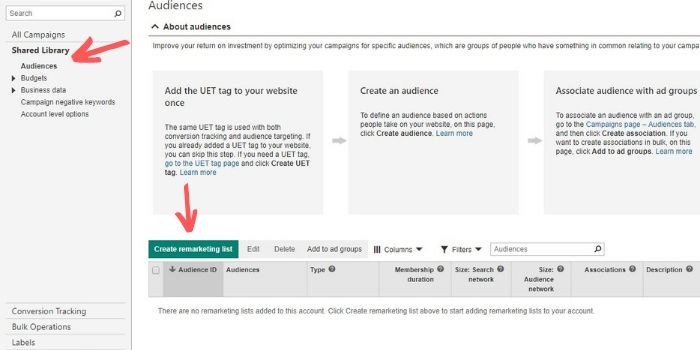
This part is really simple to set up once everything else is completed, simply go to the “Shared Library” tab on the left menu and click “Create remarketing list”.
From there you want to label it correctly and descriptive of what the audience is, take a look below:
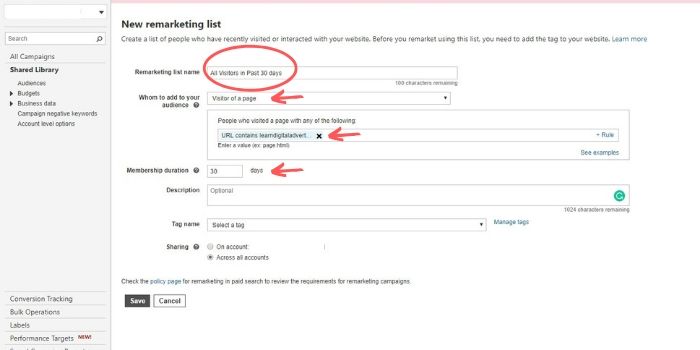
In this case, this list is for all the visitors that have come to the website in the past 30 days. All you have to use is your domain in the URL section for all visitors to be in the list. That is all for setting things up, now all you have to do is create your campaigns & ad groups and use this new retargeting audience to remind people how awesome your website or store is.